Java ME Embedded on Raspberry Pi

As far as I can tell, on habré and not only, there has been a surge of interest in the MCU devices based on ARM processors and others not quite normal glands. The market responds symmetrically. To meet any new demand appeared Arduino, Biggle Board, Raspberry Pi and many other useful things.
Since the beginning of this year, it didn habré appeared two articles on the use of Java platform to Rasprerry Pi "the Raspberry Pi and a Cup of Java, please!" and "Raspberry PI and JAVA: a closer look". It is natural that were used in the experiments familiar to all Java SE port for ARM which appeared about two years ago. Few people know that Java ME is not laid to rest together with the era of keypad phones from Nokia. She lives a full life in the new world — the world of embedded systems. About the use of Java ME on the Raspberry Pi and I want to tell you today.
Oracle Java ME Embedded is a complete Java runtime optimized for devices with ARM architecture and systems with limited hardware capabilities. Java ME shows itself in all its glory on platforms with weak computing capacities and a small memory resources, which operate network services. For example, such as wireless modules, positioning modules, "smart" resource counters, sensors for environmental monitoring, vending machines, telemedicine and, of course, smart homes.
Using the Oracle Java ME your projects gives a number of interesting possibilities. Firstly, the main advantage of Java is "write once, run everywhere" now also works in the case of embedded devices. Second, the platform integrated control system application lifecycle and remotely updating on the device (AMS — application management system). Third, you get a special API for access to peripherals (DAAPI — Device Access API). Fourth, free development tools for embedded systems the case of infrequent (Java ME SDK for NetBeans and Eclipse). And set integrated into the platform of standard services such as File I/O (JSR 75), Wireless Messaging (JSR 120), Web Services (JSR 172), Security and Trust Services Subset (SATSA – JSR 177), Location (JSR 179), XML (JSR 280).
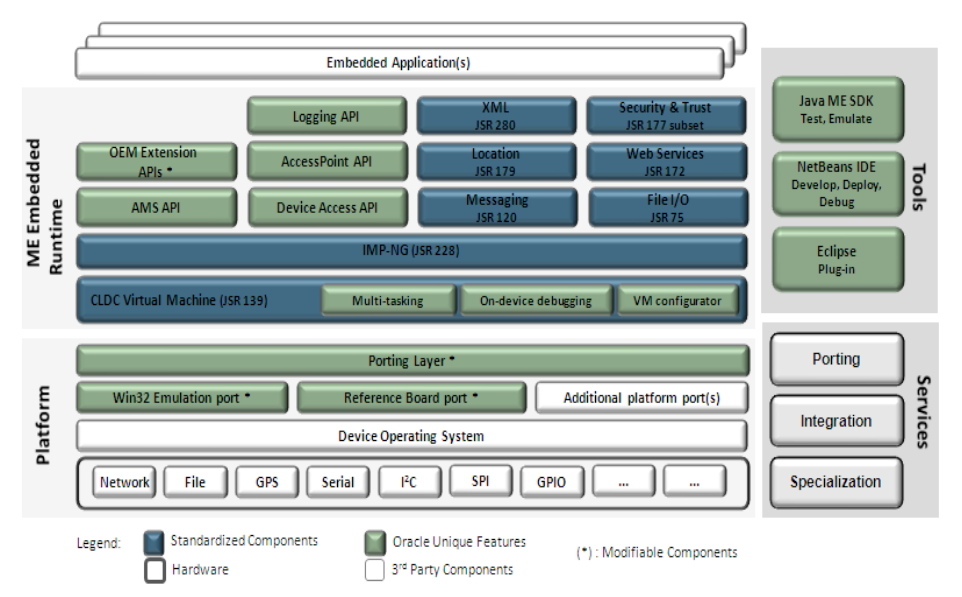
Oracle Java ME Embedded Product Stack.
As you know, Oracle Java ME Embedded product is cross-platform and supports a range of devices with ARM architecture. The current release version of the Oracle Java ME 3.3 — 3.4. Platform ported to Cortex-M3/RTX (KEIL Evaluation Board), ARM11/Linux (Raspberry Pi Model B), ARM9/BREW MP (Qualcomm IoE development), X86/Windows (emulator). The above are the reference implementation of the platform released by Oracle. Possible porting of the platform to other devices in the event of such requirements from end users.
Officially the smallest possible configuration for Oracle Java ME Embedded requires only 130 KB RAM, 350 KB ROM. Although, if you come to a meeting of Java User Group in Moscow on January 30 http://jug.msk.ru, you'll be surprised how little can be the platform, if it is to work with a file. Alexander Mironenko alexanderVmironenko will tell you how he "stuffed" in a Java 32KB! RAM. The full, standard configuration requires more memory: 700kb RAM and ROM 2000кb, which by today's standards still seems funny.

Everyone wants to all around was smart. With smart people nice to talk to, and smart house comfortable to live. Perhaps that is why most of the projects with Arduido and the Raspberry Pi have a strong focus on leveling the skills of our homes. A typical task is to monitor the temperature.
For temperature monitoring, we first used the sensors with SPI interface. But it was later revealed that the sensors with I2C much cheaper. For the manufacture of the thermometer of the Raspberry Pi and Oracle Java ME Embedded 3.3 we will need a digital temperature sensor DS1621 Dalas Semiconductor DIP8. Here you can buy it for 173 of the ruble http://www.electronshik.ru/item/ds1621-232961.
Connect it to GPIO conclusions of our Board
| DS1621 | the Raspberry GPIO pins |
| pin1 | SDA (GPIO 2) |
| pin2 | SCL (GPIO 3) |
| pin4 | GND |
| pin8 | 3.3 v |
If you read the Datasheet for the DS1621, you can see that the address of the sensor on the bus is configured using pins 5-6-7 in our example, we install them all 1 by tapping the power.

We believe that Raspbian you have and is it updated.
In order to have the opportunity to work with the I2C interface on the Raspberry Pi. You must load the appropriate module.
Add two lines to /etc/modules
the
i2c-bcm2708
i2c-dev
Overload fee.
Install utilities for working with the I2C
the
sudo apt-get install i2c-tools
The designated address of our device on the I2C bus.
the
sudo i2cdetect -y 1
The address of our sensor 4f (remember this number)
Download stable version of Oracle Java ME Embedded 3.3 for Raspberry Pi Model B. In version 3.4 has added support for the Qualcomm IoE platform. Pre-accept the license agreement. http://www.oracle.com/technetwork/java/embedded/downloads/javame/index.html?ssSourceSiteId=ocomen
Copy runtime to Raspberry and are deploying in a comfortable spot.
For instance ~/JavaME/
And as root run the AMS (Application Management System)
the
sudo ~/JavaME/bin/usertest.sh
C Raspberry Pi is finished.
Installed Java ME SDK and the plugin for NetBeans or Eclipse on your computer. http://www.oracle.com/technetwork/java/javame/javamobile/download/sdk/default-303768.html
Add our Raspberry as a device for deploying MIDlet.
In NetBeans menu, choose Tools/Java ME/Device selector
In the Device selector window, press Ctrl-D and create a new device. To do this, simply append the address of our fees click Next and if everything is in order, select the logging level.
Create project Java ME/ Embedded application
IDE will create for us a skeleton of Java ME application that inherits from the MIDlet class and consists of three methods: startApp(), pauseApp() and destroyApp(boolean unconditional). The startApp() method runs when you start the MIDlet, it is, for simplicity, we will write our code.
Java ME Embedded provides us with a high-level API communicating with the periphery — DAAPI (Deveice Access API). For operation with I2C we need to create the device configuration, send it to the factory PeripheralManager.open() and if all the wires right and Java is running as root, we get an instance of the class I2CDevice(), which will give us the opportunity to communicate with the sensor.
Below is a code example Java ME application, if something is not clear ask questions in the comments, come to the Oracle office in St. Petersburg or the 30th of January at the http://jug.msk.ru
To run this code on the device, click the right mouse button on your project in your NetBeans, select Run with... and in the opened window, Quick Project Run choose your Raspberry. Or in the project properties, select the Platform tab, choose the Device your device, then NetBeans will deplot app on Rapberry Pi by default at the start of the project.
Now you know the temperature in the room :)
Useful links:
Java ME Embedded 3.3 for Raspberry Pi
Java ME SDK 3.4
Java ME Embedded 3.3 Getting Started Guide for the Reference Platform (Raspberry Pi)
the temperature Sensor DS1621 Datasheet
the
import com.oracle.deviceaccess.PeripheralManager;
import com.oracle.deviceaccess.i2cbus.I2CDevice;
import com.oracle.deviceaccess.i2cbus.I2CDeviceConfig;
import java.io.IOException;
import javax.microedition.midlet.*;

public class IMlet extends MIDlet {

private final int CFG_ADDRESS = 0x4f; //sensor Address
private final int FREQ = 100000; //bus Frequency from Datasheet
private final int ADDRESS_SIZE = 7; //size of the address from the Datasheet
private final int BUS_ID = 1; // Internal bus ID in Java ME Embedded Getting Started Guide from

// Register addresses and values for the configuration parameters of the sensor DS1621 read more in Datasheet
private final int REG_READ_TEMP = 0xAA;

private final int READ_TEMP_SIZE = 0x02;
private final int READ_TEMP_VAL = 0x00;
private final int REG_ACC_CONF = 0xAC;
private final int ACC_CONF_VAL = 0x00;
private final int REG_START_CONV = 0xEE;
private final int REG_STOP_CONV = 0x22;

public void startApp() {
// Create config
I2CDeviceConfig config = new I2CDeviceConfig(BUS_ID, CFG_ADDRESS, ADDRESS_SIZE, FREQ);
I2CDevice device = null;
try {

// Open the device
device = (I2CDevice) PeripheralManager.open(config);

// Configurable sensor for continuous temperature measurement
write(device, new byte[]{(byte) REG_ACC_CONF, (byte) ACC_CONF_VAL});
write(device, new byte[]{(byte) REG_START_CONV});

// Read the temperature
byte temp[] = new byte[READ_TEMP_SIZE];
device.read(REG_READ_TEMP, RT_ADDR_SIZE, temp, 0, READ_TEMP_SIZE);

// Profit!
System.out.println("Temperature is:" + temp[0]);

} catch (Exception ex) { // don't do this, only for Habrahabr
ex.printStackTrace();
} finally {
// Close the device
if(device != null) {
try {
device.close();
} catch (IOException ex) {
ex.printStackTrace();
}
// Tell the app that it should self-destruct
notifyDestroyed();
}


}
}

public void pauseApp() {
}

public void destroyApp(boolean unconditional) {
}

private void write(I2CDevice i2c, byte[] buffer) {
try {
i2c.begin();
i2c.write(buffer, 0, buffer.length);
i2c.end();
} catch (IOException ex) {
System.out.println("[I2CThermometerTest] configure exception: "+ ex.getMessage());
} catch (Exception ex) {
System.out.println("[I2CThermometerTest] Peripherial not available exception: "+ ex.getMessage());
}
}
}


Comments
Post a Comment