Using Pester for testing during the development of PowerShell scripts
 When I had to write complex, large scripts in PowerShell over time to change them, I wanted to find a tool that will simplify health check my scripts. This tool turned out to be Pester — a framework for unit testing.
That he can about the basics of using it, I tell you.
Pester allows you to write tests for any executable in powershell commands or scripts. Including functions, cmdlets, modules. It allows you to group tests so that you can run all tests at once, or only tests a specific function or tests of all the functions of a particular script.
Pester can be run in powershell console or integrated development environment. This can be one of created for PowerShell IDE (PowerShell ISE, etc.) and Visual Studio with PowerShell Tools for Visual Studio 2015. Pester can help you if you heard development through testing and wanted to try it to develop your scripts. And if you have already finished the scripts for which you want to do tests – Pester will help you too.
How to start. Download and integration with the Pester PowerShell ISE
Pester is a powershell module written by Scott Muc published on Github. In order to use Pester you just download it and unzip to a folder a folder in your Modules directory on your computer.

What is the \ Modules folder?
Modules Folder several. For example, the Modules folder in the path %UserProfile%\Documents\WindowsPowerShell\Modules allows you to store modules that are only required of your account. And, as a rule, that folder does not exist, while you yourself do not create. And in the %windir%\system32\WindowsPowerShell\v1.0\Modules stores the modules that are available to all users.
Relevant to your system list of folders to store powershell modules is stored in the environment variable $env:PSModulePath. For example, the folder list Modules from my computer:
the
This list may change when you install software, for example the Lync Server administration tools when you install add to the list the path to the folder with your modules.
Relevant to your system list of folders to store powershell modules is stored in the environment variable $env:PSModulePath. For example, the folder list Modules from my computer:
the
PS C:\> $env:PSModulePath -split ';'
F:\Users\sgerasimov\Documents\WindowsPowerShell\Modules
C:\Windows\system32\WindowsPowerShell\v1.0\Modules\
This list may change when you install software, for example the Lync Server administration tools when you install add to the list the path to the folder with your modules.
Use the \ Modules folder in the current user's profile. Create it using Windows Explorer or powershell as shown below:
the
cd $env:USERPROFILE\documents
new-item -Name WindowsPowerShell -ItemType directory
new-item -Path .\WindowsPowerShell -Name Modules-ItemType directory

After that unzip the archive in a folder Pester in the folder Modules.

To integrate with the Pester PowerShell ISE, create a folder %UserProfile%\Documents\WindowsPowerShell Microsoft.PowerShellISE_profile.ps1 with the following contents:
the
try
{
Import-Module Pester
}
catch
{
Write-Warning "Import the Pester module failed"
}
If the file is already there, just add the above code to a file.
Now, every time you start PowerShell ISE module Pester will be loaded automatically and you will only have to use it.
How to write tests and execute? General scheme
Tests are written in separate files. By default, the following decision:
Each script creates a file with a name inaccept.Tests.ps1. For example, you have the CreateUser script.ps1 or do you plan to write a script with that name. Then the tests for this script and you put in a file called CreateUser.Tests.ps1.
When you write the tests and will run them, Pester will see all the files with the ".Tests." in the name in the current and in subdirectories, and run tests of them. This allows, for example, to store the files with the tests in a subfolder and not in the folder with scripts.
The test file is a powershell script with the test groups. You can define multiple levels of nested test groups using the commands Describe and Context. Team It describes 1 test.
Are very simple example we will demonstrate how to use Pester to write and run tests. To understand the schema.
Example
Let's say you have a script that returns after executing the “Hello World!” and you have to write the test.
The script file HelloWorld.ps1 you already have:
the
return "Hello world!"
Create a file named HelloWorld.Tests.ps1. There will be a test to your script that will check that the script returns after starting the "Hello world!":
the
Describe "Test script HelloWorld" {

it "the Script returns the string Hello World!" {

$result = .\HelloWorld.ps1
$result | Should Be "Hello World!"

}
}
The Describe block describes in General what the script is tested, and the block It contains the test itself. First line
the
$result = .\HelloWorld.ps1
the
$result | Should Be "Hello World!"
If the test specified by Should succeeds, the test passes, otherwise the test is considered failed.
Copy the code above in a file named HelloWorld.Tests.ps1 and save this file.
After that, make sure that the current directory points to the folder which contains the file HelloWorld.ps1 and HelloWorld.Tests.ps1. I have it “F:\Projects\iLearnPester\Examples>” run the command Invoke-Pester to run the tests:

The test was successful. This is evidenced by the green line with the name of the test (corresponding to the phrase after you block It). If the test fails, the test name is displayed in red, and below it is indicated what went wrong.
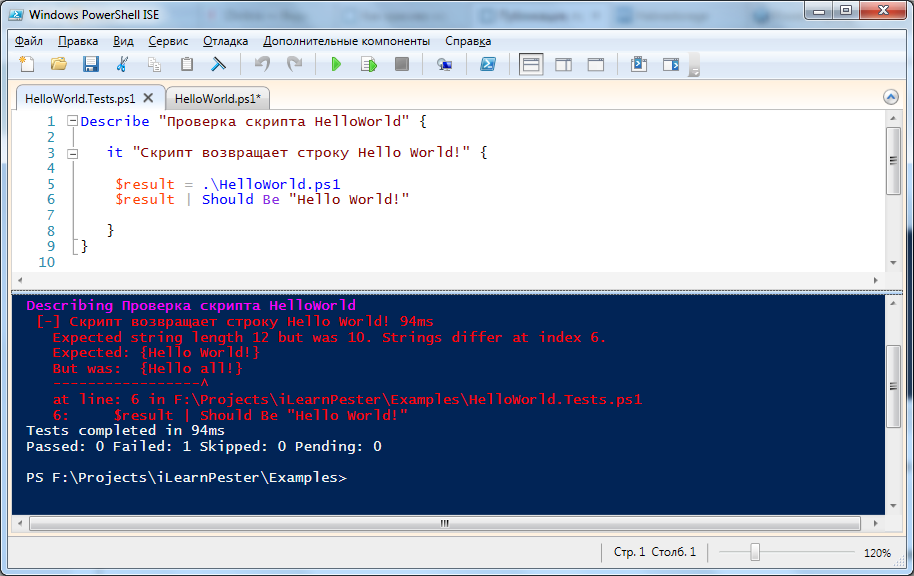
Expected the string "Hello World!", but the script returned the string "Hello all!". In addition, specify the test file and the line where the file test is a failed test.
If you want to try development through testing. Then you first write the test, then the script/function to it.
The command Should and the statement that follows it (for example, Be) together create a Statement. Pester is in the following statements:
the
-
the
- Should Be the
- Should BeExactly the
- Should Exist the
- Should Contain the
- Should ContainExactly the
- Should Match the
- Should MatchExactly the
- Should Throw the the
- Should BeNullOrEmpty
Inside the approval is always possible to insert Not, and to do the negation, for example: Should Not Be, Should Not Exist.
Tell me more about approval
Compares one object with another and throws an exception if objects are not equal. Compares strings case-insensitive, numbers, arrays of numbers and strings. Custom objects (pscustomobject) and associative arrays are not compared.
the
What Should Be, only compares strings case sensitive
the
Verifies that the object exists and is available to one of PS providers. The most typical is to check that the file exists. Essentially performs cmdlet test-path for the passed values.
the
Note that you can only verify the presence of the following registry branches that way, but not any specific key, because the PS provider is working with the registry gives access to the keys as properties of the registry hives. He does not consider them objects.
Checks that the file contains specified text. The search is case-insensitive and can use regular expressions.
the
Checks that the file contains specified text. The search is case-sensitive and can use a regular expression.
the
Compares two strings using the regular expression case-insensitive.
the
Compares two strings using regular expressions case-sensitive.
the
Is true if the test script-block the exception occurs. You can also specify the expected exception text.
The input is passed to the script block. With features, unfortunately, does not work.
the
Verifies that the passed value is $null or empty (string, array, etc.). It is worth Recalling that $null is not 0.
the
Should Be
Compares one object with another and throws an exception if objects are not equal. Compares strings case-insensitive, numbers, arrays of numbers and strings. Custom objects (pscustomobject) and associative arrays are not compared.
the
#line
$a = "string"
$a | Should Be "string" #will be successful
$a | Should Be "STRING" #will be successful
$a | Should Be "Another string" #fails
$a | Should Not Be "Another string" #succeeds

#numbers
$a = 10
$a | 10 Should Be #successful
$a | Should Be 2 #fails
$a | 2 Should Not #successful

#arrays of numbers
$a = 1,2,3
$a | 1,2,3 Should Be #successful
$a | Should Be 1,2,3,4 #successful
$a | Should Be 4,5,6 #fails

#arrays of strings
$a = "qwer","asdf","zxcv"
$a | Should Be "qwer","asdf","ZXCV" #succeeds
$a | Should Be "qwer","asdf","zxcv", "rrr", #succeeds
Should BeExtactly
What Should Be, only compares strings case sensitive
the
$actual="Actual value"

$actual | Should BeExactly "actual value" # fails
Should Exist
Verifies that the object exists and is available to one of PS providers. The most typical is to check that the file exists. Essentially performs cmdlet test-path for the passed values.
the
$actual=(Dir . )[0].FullName
Remove-Item $actual
$actual | Should Exist # fails

import-module ActiveDirectory
$ADObjectFQDN = "AD:CN=Some User,OU=Users,DC=company,DC=com"
$ADObjectFQDN | Should Exist # succeeds if the user has

$registryKey = "HKCU:\Software\Microsoft\Driver Signing"
$registryKey | Should Exist # succeeds if the registry branch is.
Note that you can only verify the presence of the following registry branches that way, but not any specific key, because the PS provider is working with the registry gives access to the keys as properties of the registry hives. He does not consider them objects.
Should Contain
Checks that the file contains specified text. The search is case-insensitive and can use regular expressions.
the
Set-Content -Path c:\temp\file.txt -Value 'Eat still these soft French buns'
'c:\temp\file.txt' | Should Contain 'Eat some More' # succeeds
'c:\temp\file.txt' | Should Contain 'Eat*rolls' # succeeds
Should ContainExactly
Checks that the file contains specified text. The search is case-sensitive and can use a regular expression.
the
Set-Content -Path c:\temp\file.txt -Value 'Eat still these soft French buns'
'c:\temp\file.txt' | Should Contain 'Eat some More' # fails
'c:\temp\file.txt' | Should Contain 'Eat*rolls' # succeeds
Should Match
Compares two strings using the regular expression case-insensitive.
the
"Bob" | Should Match ".Asya" # succeeds
"Bob" | Should Match ([regex]::Escape(".Asya")) # fails
Should MatchExactly
Compares two strings using regular expressions case-sensitive.
the
"Bob" | Should Match "BOB" # fails
"Bob" | Should Match ".Asya" # succeeds
Should Throw the
Is true if the test script-block the exception occurs. You can also specify the expected exception text.
The input is passed to the script block. With features, unfortunately, does not work.
the
{ neobyatnoy } | Should Throw # successful

{ throw "Error in function parameter validation" } | Should Throw "Error in function parameter validation" # succeeds

{ throw "Error in function verification results" } | Should Throw "Error in function parameter validation" # fails

{throw "Error in function verification results"} | Should Throw "results" # succeeds

{ $foo = 1 } | Should Not Throw # successful
Should BeNullOrEmpty
Verifies that the passed value is $null or empty (string, array, etc.). It is worth Recalling that $null is not 0.
the
$a = $null
$b = 0
$c = [string]""
$d = @()

$a | Should BeNullOrEmpty # successful
$b | Should BeNullOrEmpty # fails
$c | Should BeNullOrEmpty # successful
$d | Should BeNullOrEmpty # successful
What else he can do?
Mock functions
Pester is in the mock-functions that allow you test before calling to override any function or cmdlet.
For example, you are developing a script that will receive the ip address of the current machine and depending on which network this address belongs to prescribe one or the other dns server in the adapter settings. But your machine where you are developing the script for only 1 ip address and change it to troublesome tests. Then you just test before calling the override function, receiving ip address so that it returned not the current address and need to check.
Here is a sketch of our script (let's call SmartChangeDNS.ps1).
the
$MoskowNetworkMask = "192.168.1.0/24"
$RostovNetworkMask = "192.168.2.0/24"

$IPv4Addresses = GetIPv4Addresses
foreach($Address in $IPv4Addresses)
{
if(CheckSubnet -cidr $MoskowNetworkMask -ip $Address)
{
#set dns 192.168.1.1
}

if(CheckSubnet -cidr $RostovNetworkMask -ip $Address)
{
#set dns 192.168.2.1
}
}
He knows 2 mask of the network in Moscow and Rostov. Gets using the function GetIPv4Addresses all IPv4 addresses of the current machine and then in a loop foreach verifies the ownership of any of the subnet addresses by CheckSubnet. The function GetIPv4Addresses and CheckSubnet you've already written and tested. Now to check functions in General, we need to write tests, in which we override the function GetIPv4Addresses so that it returns the right address. Here's how:
the
describe "SmartChangeDNS" {

it "if the computer is on the network 192.168.1.0/24" {
Mock GetIPv4Addresses {return "192.168.1.115"}
.\SmartChangeDNS.ps1

$DNSServerAddres = Get-DnsClientServerAddress -InterfaceAlias "Ethernet" -AddressFamily IPv4 | Select-ExpandProperty ServerAddresses

$DNSServerAddres | Should Be "192.168.1.1"
}

it "if the computer in the network 192.168.2.0/24" {
Mock GetIPv4Addresses {return "192.168.2.20"}
.\SmartChangeDNS.ps1

$DNSServerAddres = Get-DnsClientServerAddress -InterfaceAlias "Ethernet" -AddressFamily IPv4 | Select-ExpandProperty ServerAddresses

$DNSServerAddres | Should Be "192.168.2.1"
}

}
Now whenever you run a script it comes to the execution of the function GetIPv4Addresses, will be executed is not the version specified in the script, and the one that we have identified team Mock.
Overriding a function using a Mock abstracts, when necessary, from external systems or modules called functions.
TestDrive
Pester provides a temporary PS file which you can use to work with the file system under test execution. Such a disk exists in the same block with the Describe or Context.
If the disk is created in the Describe block, it and all files created on it are visible and available for modification in the blocks Context. Files created in the block Context with the completion of this unit removed and remain only files created in the Describe block.


Comments
Post a Comment